Create and Start a Concept Project Workflow
Background
Manage and track your concept project approvals directly within Procore, eliminating the need for fragmented emails, spreadsheets, and offline documents. This dedicated workflow provides traceability for your concept projects, giving you a clear, centralized audit trail of who approved or rejected a project—and why.
When a workflow starts, designated users automatically receive notifications to approve or reject their specific step. Procore automatically archives all decisions and comments within the project, ensuring an easily accessible audit trail for future reference.
Things to Consider
Required User Permissions:
Create a Workflow Template
'Admin' level permissions on the Company Workflows tool.
OR'Read Only' or 'Standard' level permissions on the Company Workflows tool with the 'View Workflow Templates' and 'Create and Edit Workflow Templates' granular permissions enabled on your permissions template.
Configure a Concept Project Workflow for your Project
'Admin' level permissions to the project's Admin tool.
Start a Concept Project Workflow
'Admin' level permissions to the project's Admin tool.
Additional Information:
Starting the workflow automatically locks the 'Concept' project stage. The project stage field can be manually updated only after the workflow has been approved.
Currently, only one concept project workflow can be run at a time.
After a concept project workflow has been started or approved, the Workflows option in the project's Admin tool is no longer visible. If a workflow is rejected, the Workflows option again becomes available in the project's Admin tool and a new workflow can be initiated.
Steps
Create a Workflow Template
Create a Workflow, selecting Concept Project for the Tool. Show / Hide Steps
Add a Workflow
Navigate to the Company level Workflows tool.
Click Create. This opens the 'Add a Workflow' dialog box.
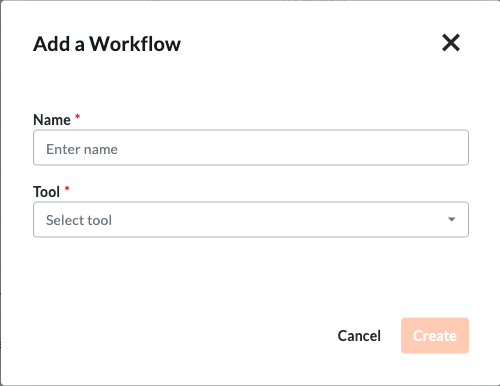
Enter a Name for the workflow.
Select the tool for the workflow from the Tool menu.
NoteSome Procore tools must be enabled to appear as a selection in this list. For a list of available tools, see Which Procore tools support Workflows?
Click Create. Procore opens the workflow builder and creates an 'Untitled' first step for you.
Update the First Step in the Workflow
Begin by selecting the type of step (Response Step, Condition Step) you will use at the start of the workflow.
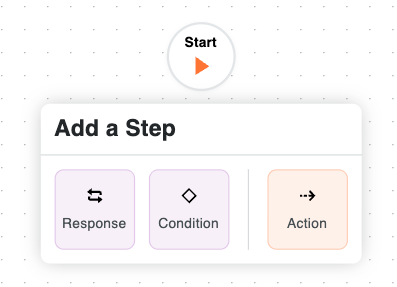
Follow the instructions for the selected step type:
Add a Response Step to a Workflow
Add a Condition Step to a Workflow
Add an Action Step to a Workflow
Add a Response Step to a Workflow
Enter the following information in the General Information section:
Step Name. Enter a name for the step.
Type. Select Response Step.
Item Status. Enter the item status that will be associated with this workflow step.
Days to Complete. Enter the number of days the 'Responsible Group' has to complete the workflow step. Then select Calendar Days or Business Days from the drop-down list. Once the set number of days passes, Procore sends a reminder email until the step is complete.
Optional: Notification Recipients. Select the groups or roles that should receive an automated notification when the workflow step is NOT completed within the number of days specified under Days to Complete. The recipients named here will also receive an email when the workflow step is completed. The default groups include:
Workflow Manager. A workflow manager is a Procore user who must be designated on a project.
Item Creator. An item creator is a Procore user who created the item on a project.
Distribution Group. After you publish this workflow and assign it to a project, you can define different group members when configuring the workflow on the Project level.
All Project Users from the Company. All project users from the item creator's company who are assigned to the project are automatically notified when you select Item Creator's Company from the notification recipient list.
Add Assignees
Complete the Assignees section:
Decision Type. Select one of default decision types for the step. This setting will also determine which response requirement options are available.
First responder decides.
Multiple responders decide.
Only required responders decide. Check this box if you want the final decision on the step to be determined only by responders in roles with one or all members required to respond.
Click Manage Assignees.
You can manage assignees based on Project Role or Custom Role assignee type. Depending on your assignee configuration method, follow the relevant instructions:
Project Role Assignees:
No manual updates are required to manage individual assignees.
Assignees are automatically populated into each workflow step based on the assigned project roles from theProject Directory.
Important: Ensure project directory roles are correctly assigned and up-to-date. See How to auto-assign project roles to workflow steps? for details.Create Project Roles within the Company Admin Tool. Learn how →
Assign individuals to Project Roles within the Project Directory Tool. Learn how →
Configure a Workflow Template at the company level. When configuring each workflow step, select the relevant Project Role(s) you wish to assign to that step.
For any project the template is assigned to, the individuals associated with those Project Roles will auto-populate into each workflow step according to your company-level workflow template configuration.
Ensure that all members listed in the Project Directory have the appropriate permissions needed for items within each tool and the correct workflow permissions.
To complete the configuration, it is still necessary to manually configure the Workflow Manager for each project template per tool. This step is required because the Project Directory is managed per project, and the Workflow Manager may vary by tool.
Custom Role Assignees:
Click Manage Assignees in the step details under the Assignees section.
Click Edit Members next to the custom role.
Select users from the available project directory members. Note: Each custom role on a workflow step must have at least one assigned user.
(Optional) If the decision type is Multiple Responders Decide, you can set each member’s requirement using the Required to Respond? drop-down list.
Click Done to confirm your assignee updates.
Click Save to finalize your changes. Note: If any required fields have missing information, a banner will appear at the top of the workflow viewer. Click Show Details to see which step needs updating.
You can also bulk assign project roles from the Company Directory.
Add Responses
Once the assignee roles for the step have been determined, the next step is to add responses. The options available when adding responses are determined by the step's decision type and whether or not any responders are required.
The steps for adding responses are separated by decision type. Follow the steps for the decision type selected on the step.
Add a Condition Step to a Workflow
Condition steps allow a workflow path to be routed differently depending on whether the conditions of the step are met. To create a condition step, follow the instructions below.
Enter the following information in the General Information section:
Step Name. Enter a name for the step.
Type. Select Condition Step.
When. Select the first part of the hypothesis in the conditional statement. Different conditional statements exist for each tool. See Conditional Statements By Tool.
Greater than. If your organization requires additional signatures for amounts greater than or equal to a specified amount, you will want to choose this option and enter an amount in the field to the right.
Less than. If you want the step to function when the hypothesis is less than a specified number.
Is. If you want the step to function when a certain field is selected for a custom field.
Is Checked. If you want the step to function when a custom field checkbox is checked.
Contains any of. If you want the step to function when one or more multi-select options are chosen for a custom field.
Then. Select a step from the drop-down list or create a new one by clicking the Add Step button.
Otherwise. Select a step from the drop-down list or create a new one by clicking the Add Step button. This is the workflow's next step if the conditions for the current step are NOT met.
Choose from these options:
Cancel. Click this button to discard any changes you have made.
Save as Draft. Click this button to save a numbered 'Draft' workflow version. Choose this option when you are still working on creating your workflow.
Save and Publish. Click this button to create a newly published version of the workflow. Choose this option when you are ready to assign your workflow to a project.
Conditional Statements by Tool
* Conditional statements linked to the project’s budget are based on the total amount of the selected workflow column. You can set this column while configuring your budget settings under the Workflow Column tab in the Company level Admin tool. See Create or edit a budget view.
Add an Action Step to a Workflow
Action steps details the various actions you can perform as the next step on a Workflow. Currently, the supported action steps are End Workflow, Send Webhook, and Sync ERP External Data.
End Workflow
An End Workflow action defines the end of a workflow and that the workflow is complete.
Click the
 icon attached to an existing step in the workflow builder. Select Action > End Workflow.
Enter the following information in the General Information section:
Step Name. Enter a name for the step.
End Type. Choose Success OR Failure.
Item Status. Select the appropriate status. Status options vary by tool.
Optional: Notification Recipients. Select the groups or roles that should receive an automated notification when the workflow step is completed. The default groups include:
Workflow Manager. A workflow manager is a Procore user who must be designated on a project.
Item Creator. An item creator is a Procore user who created the item on a project.
Distribution Group. After you publish this workflow and assign it to a project, you can define different group members when configuring the workflow on the Project level.
Choose from these options:
Cancel. Click this button to discard any changes you have made.
Save as Draft. Click this button to save a numbered 'Draft' version of the workflow. Choose this option when you are still working on creating your workflow.
Save and Publish. Click this button to create a newly published version of the workflow. Choose this option when you are ready to assign your workflow to a project.
Send Webhook
A Send Webhook action sends workflow data to an external system when the workflow reaches a specific stage. This action works with all workflow types.
In the Response section of the workflow builder, navigate to the Go to Step.
Click the plus (+) Create New Step and select Action > Send Webhook.
Enter the following information in the General Information section:
Step Name: Enter a name for the step.
Type: By default, this is set to 'Action Step'.
Optional: Notification Recipients. Select the groups or roles that should receive an automated notification when the workflow step is completed. The default groups include: Workflow Manager, Item Creator and Distribution Group.
Optional: Under the Send Webhook - Details section, enter Custom Data.
Note: This data will be included in the webhook payload along with standard workflow information. Example: JSON data, Simple messages and Reference numbers.
In the Go to Step section, select the next relevant step or select End Workflow.
Click Save and Publish. The send web hook action is successfully added in the workflow.
Create a new webhook:
Once you have added the action to your workflow, set up a webhook in the project to receive the data from Procore:
Select your project and navigate to the project's Admin tool.
Under Project Settings on the left panel, click Webhooks. This opens the Project Webhooks window.
Click + Create Hook on the top right corner. This opens the New Hook window.
Enter the following information in the Endpoint Configuration section:
Endpoint URL: Enter the URL to receive the request payload when an event occurs.
Authorization Header: Enter the token to be placed in the header of a POST request from Procore.
Payload Format: Select the REST API payload version you would like to receive. Note: Once the hook is created, the payload version cannot be changed.
Scroll to the Select the Events to Send section.
Under Tools > Core > Workflows, select Workflow Instance.Custom.
After filling the required fields, click + Create Hook.
The hook appears on the Project Webhooks page with the Hook ID, Status, Subscribed To, and Endpoint URL. An edit icon is also available.
Note: When the workflow reaches the configured step, the webhook is automatically sent to the endpoint URL for the selected action.
Sync ERP External Data
A Sync ERP External Data action synchronizes workflow item data with an ERP integration when the workflow reaches a specific stage. This allows your accounting system to identify records that are ready to be pulled from Procore automatically. This action requires no configuration and is supported for the following workflow types: Company Direct Costs, Invoices, Payment Applications, Prime Contracts, Purchase Order Contracts, Work Order Contracts, Budget Changes, Prime Change Orders (all types), and Commitment Change Orders (all types).
In the Response section of the workflow builder, navigate to the Go to Step.
Click the plus (+) Create New Step and select Action > Sync ERP External Data.
Enter the following information in the General Information section:
Step Name: Enter a name for the step.
Type: By default, this is set to 'Action Step'.
Optional: Notification Recipients. Select the groups or roles that should receive an automated notification when the workflow step is completed. The default groups include: Workflow Manager, Item Creator and Distribution Group.
In the Go to Step section, select the next relevant step or select End Workflow.
Click Save and Publish. The Sync ERP External Data action is successfully added to the workflow.
Save a Workflow Template
The following options are available to save the workflow template:
Save as Draft. Click this button to save a numbered 'Draft' version of the workflow. Clicking Save as Draft will not close the workflow builder so you can save your work as you go. Draft workflow templates cannot be used on projects.
Save and Publish. Click this button to create a newly published version of the workflow. Published workflows can be used on projects.
Cancel. Click this button to discard any changes you have made.